We are alllll about simple Christmas decor. And since we change it up every year, we usually thrift all of our decor goodies. Here are some ideas for next year.
We found these painted wine glasses at a thrift store. We don't drink so I turned them upside down, stuck some old ornaments in the bottom and put a tea light candle up top. The ornament candle holders in between are from the same thrift store.
These candle sticks were given to us. They were an ugly green color so I sprayed them white. The little black candle holder was thrifted as well as the glass (and pinecones.) The glass vase sits on top of a glass tea light candle holder for height.
Trey's painted pine cone "mini trees". See previous post.
In our hallway hangs our stockings, Trey's holiday wall art, (see previous post) and our clothes pin line of photos we took this year.
And again. I took these, edited and printed myself.
And again.
We try to avoid Walmart at all costs, but we popped in one day for TP;) and found these peppermint candles. A set of three for just $3. The plate was a $1 at a thrift store.
All glasses, the red candle and Christmas tree were thrifted. The poinsettias and vanilla candle were from Walmart.
Our skinny tree. But hey, it was $6 so why not?!
Trey found this santa at the thrift store.
As well as this bear.
All other ornaments and ribbon were from previous years. Our colors are always red and gold.
BONUS photos.
Hanging out in his new PJ's. We got new PJ's today to wear for gift opening.
Trey and his "braddah". Yeah, our doggy is our baby too.
Well, we had to test out our Christmas pajamas too! lol.
I think I spent under $30 for all of our holiday decor this year. Not bad!
I know. I know. I've been slacking on posting AND we are doing our annual Christmas crafts a little too late. I've been busy with my jewelry business. Actually, busy doesn't even begin to describe it. lol. But as of Monday the 23rd, I am on vacation until January 6th. (BIG sigh of relief.)
Anyway, here are some of our last minute Christmas crafts. (The wreath goes by the kitchen and the others go in our hallway. Photos to follow within the next few days.)
Painted Pine Cone "Mini Trees"
I didn't get step-by-step photos but these are pretty obvious, lol. Slap some paint on the pine cones and let 'em dry! Add glitter if you'd like.
Fingerprint Lights
Draw the light "string"
Add little black rectangles.
Have your child(ren) choose their light colors. Trey chose five. Start Finger printing away!
Do one color at a time
Until you fill up your string.
What a great keepsake!
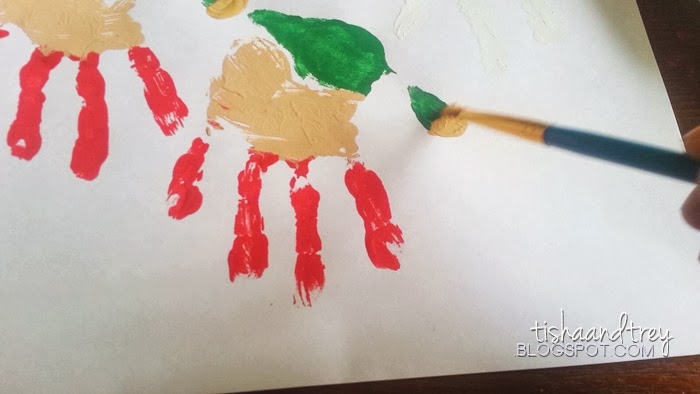
Santa & His Elves Hand Print Art
We used acrylic paint for all of our projects but you could
probably use whatever you have on hand.
For the elves:
Paint your child(ren)'s fingers red, palms a skin tone
color and bottom half and thumb green.
Press firmly.
Lift gently.
Repeat last 4 steps.
Your elves are finished.
Now for santa: I didn't get a chance to take a photo
of Trey's hand before we pressed them.
White for the fingers, skin tone for palms
and red where the green was for the elves.
We didn't put enough paint so we had to do it one more time.
Let your prints dry and add details. White for his mustache.
White at the tip of santa's hat.
White at the trim of his hat
Golden color at the tip of the elves' hats for "bells".
Draw in the eyes and mouth.
Same for the elves.
Color in the eyes.
Hand Print Reindeer
I painted Trey's (right) hand brown.
Then added black for the "antlers"
Press firmly.
Try not to move the fingers.
I didn't get to take a photo of the second half of the reindeer (the body.)
We made a mistake, though. I used Trey's same hand (the right side) to do the body.
I should have used his other hand.
Just flip the picture upside down, repaint the brown,
even the fingers and add black to the very tips for "hooves".
and use the other hand to print the body.
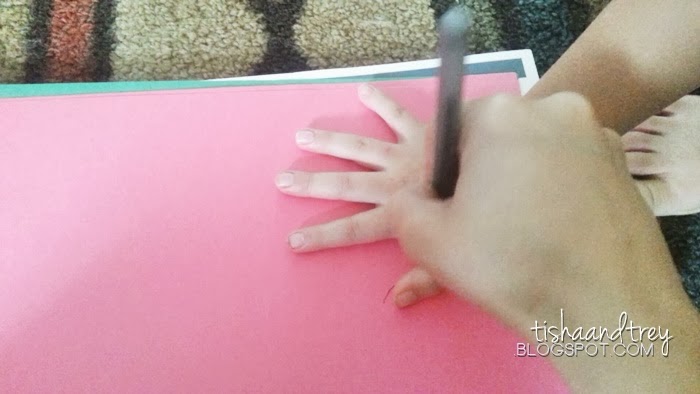
Hand Print Wreath
PLEASE forgive all the crappy photos. I had to use my phone to film and most
of these photos are actually screenshots from the videos I shot.
Get two sheets each of red and green construction paper. Trace your child(ren)'s hand.
Cut the one tracing out and use it as a template to trace 15 more hand prints.
Cut (or if they're old enough, have them cut your tracings out.)
Staple (or glue) to a ring shaped card stock. (which I just cut out on my own.)


 Hanging out in his new PJ's. We got new PJ's today to wear for gift opening.
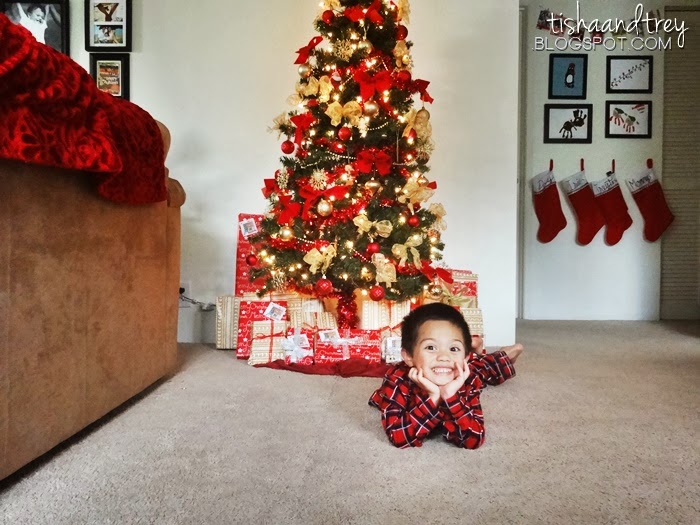


